As we all know, air dry clay is an excellent medium for making crafts. Both kids and adults can use it easily. So, what air dry clay crafts can you make with your kids?
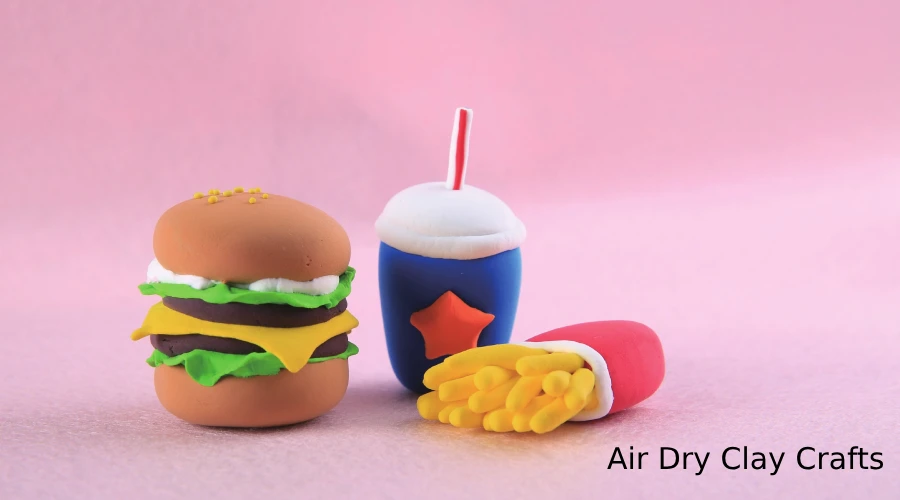
In this blog, we have collected 10 simple but fun clay crafts tutorials that kids can make step by step. In addition, we have set up a table of contents on the left side of the PC page. You can click on the titles of interest to read.
All you need is air dry clay (also known as super light clay). If you find that a tutorial uses a tool you’re unfamiliar with, you can find similar alternatives at home.
① Air Dry Clay Miniature Craft: Hamburger
In this tutorial, we will make a mini hamburger.
Material Preparation
We need some white, yellow, dark brown and cyan air drying light clay.
Instructions
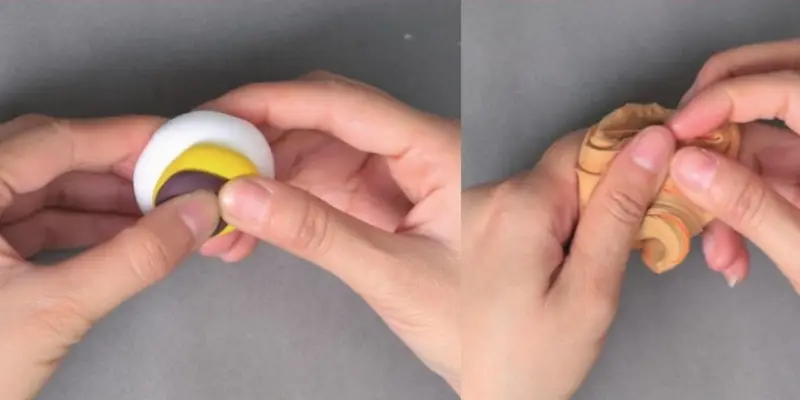
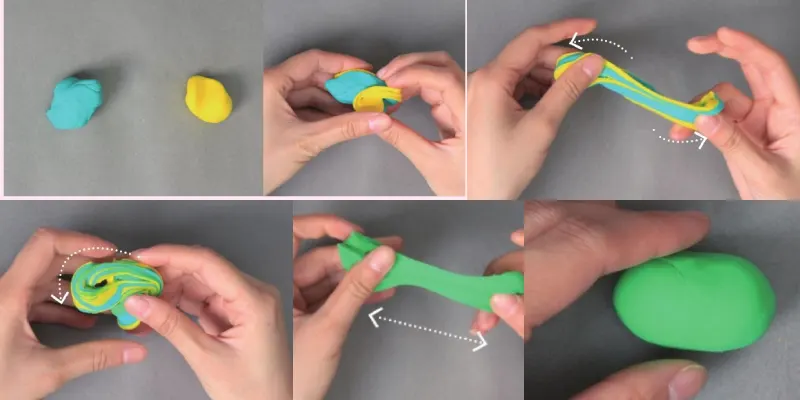
Step 1: Mix white, dark brown and yellow air-dry clay to create a bread-like wheat color.
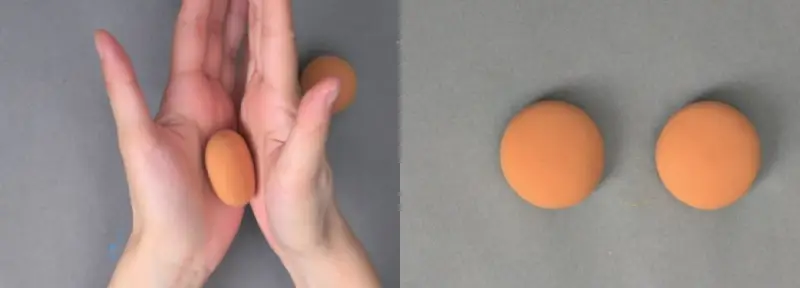
Step 2: Roll out two wheat-colored balls of similar size and flatten them. Well, they’re just the two slices of hamburger buns.
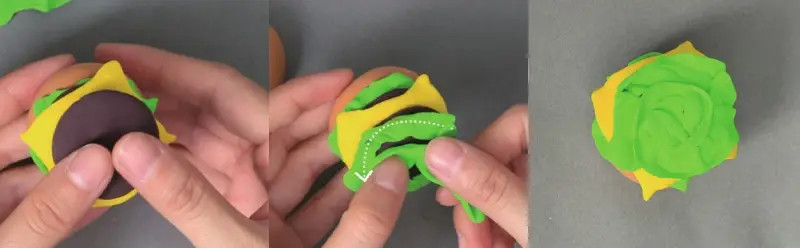
Step 3: Mix yellow and cyan clay to get the green color of the vegetable leaves. Roll leaf-green clay into a long, thin shape.
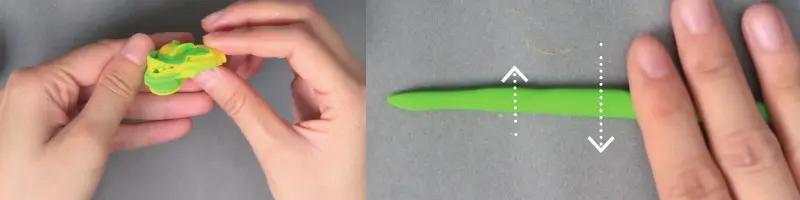
Step 4: Gently press and pull the clay with your fingers to flatten the clay into long, flat strips, just like the picture shows. Then, place the strips in circles on a piece of wheat-colored clay.

Step 5: Knead two dark brown clay balls and flatten them slightly with your hands to make them look like small meat patties. Place patties on burger greens.

Step 6: Take a small piece of yellow air-dry clay and shape it into a square cheese slice. Note that you don’t have to make it straight on all sides, the more casual it looks the better. Place cheese slices on top of patties.

Step 7: Follow similar steps as before, put the meat patties and add some vegetable leaves.
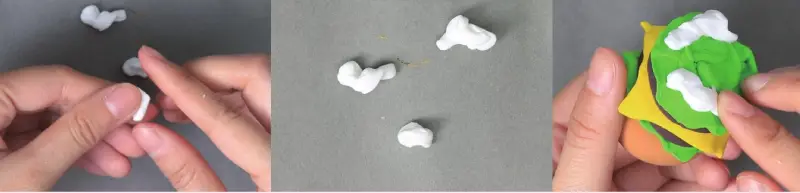
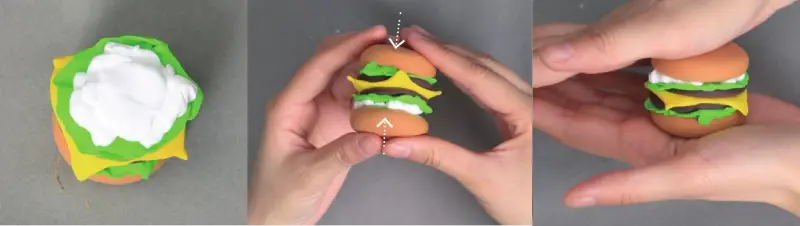
Step 8: Take a little bit of white clay, pinch out a few cloud shapes and lay them on the leaves. Note that you should try to keep them as close to the edge as possible, otherwise the bread slices may get in the way.
Step 9: After spreading the salad dressing, we cover it with the remaining piece of wheat-colored air-dry clay. Remember to press lightly in your hand to make the hamburger look fuller.
Step 10: Mix white and yellow clay to make a light yellow one, then knead it into sesame seeds and spread it on top of the burger.
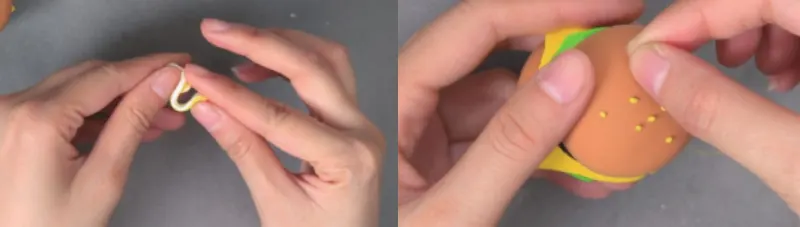
In this way, we have completed a cute mini burger.
Notes
- Each layer of the burger should be about the same size. Avoid some being large and some being small, as the larger ones will block the smaller ones.
- The thickness of each layer of clay should be appropriate. Too thick or too thin will affect the appearance of the burger.
- When making cheese slices, lettuce and salad dressing, use your fingers to pinch the edges as wavy or curled as possible.
② Miniature Clay Idea: Fries
Now, let’s make the miniature clay fries idea. This is much easier than a hamburger and we can make it in just 5 steps.
Material Preparation
We only need 3 colors of air dry clay: yellow, red and white. Additionally, you will use a pair of scissors.
Instructions
Step 1: Take red light clay, roll it into a ball, and then flatten it gently. Be careful not to press it into paper, you want it to have some thickness.
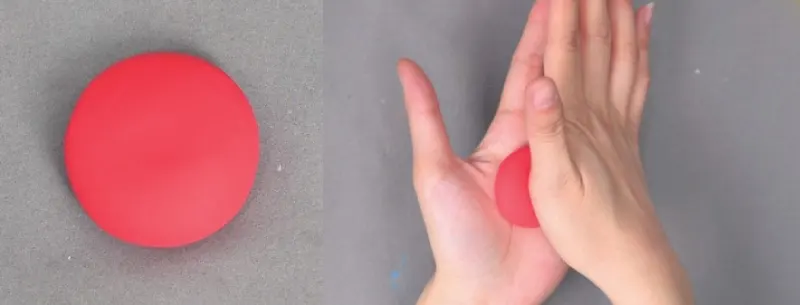
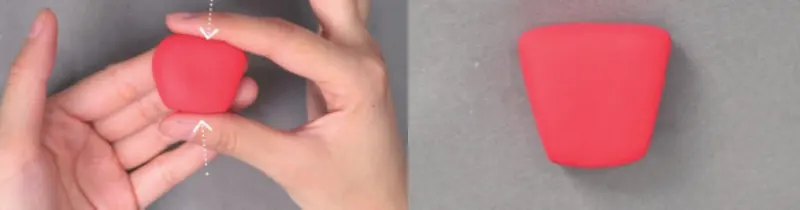
Step 2: Use your fingers to shape the clay into a trapezoid shape. This is the cardboard box that holds the fries.
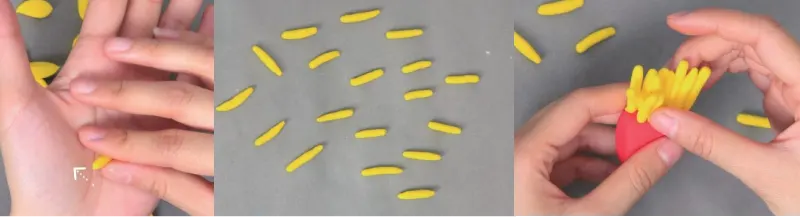
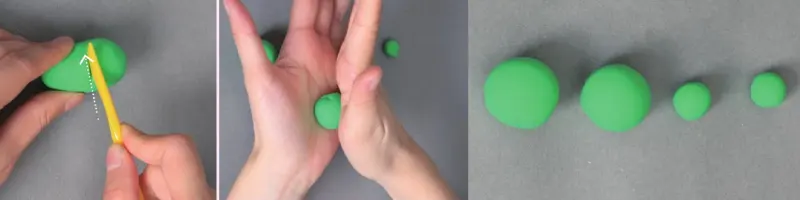
Step 3: Roll the yellow clay into a long strip as thick as your little finger. Next, use a pair of scissors to cut out the small balls. You can use a ruler or card instead of scissors, or fingernails, too.

Step 4: Use your fingertips to roll the small yellow balls into long and thin strips, and then stick them vertically on the top of the red clay.
Step 5: Take a little white clay and knead it into a long strip about the same diameter as French fries. Wrap the long strip around the carton of French fries and cut it off with scissors at the final connection.
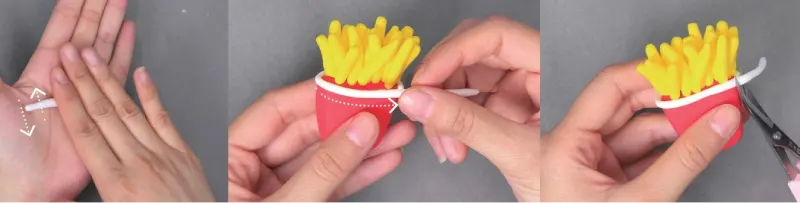
We finished the miniature fries craft and put it with the burger, isn’t it awesome?
Notes
- Don’t make the fries too long, otherwise they won’t look like fries.
- When you can’t find scissors or are worried about it hurting your child, you can replace it with a gentler tool such as a ruler or card.
③ Mini Air Dry Clay Craft: Mc Donald’s Coke
In addition to hamburgers and fries, how can there be no cola in a McDonald’s meal? We are now going to use air-drying clay to make a miniature Coke.
Material Preparation
In this tutorial, we will use 4 colors of air-dry clay: blue, white, red, and orange. Also, we will be using a knife, but you can also use a ruler instead.
Instructions
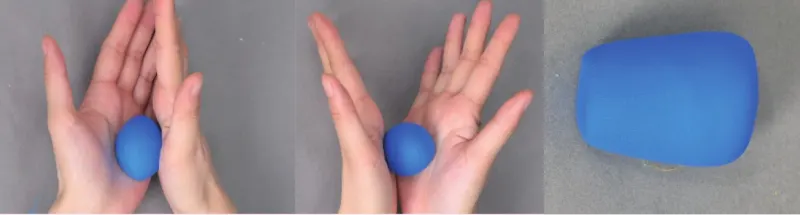
Step 1: Take blue air dry clay and knead it into the shape of a cup. You can start by kneading it into a ball. Then squeeze and roll one end of it with your hand to make it into a cup shaped cylinder.
Step 2: Take a bit of white clay, knead it and flatten it to cover the top of the blue cup.
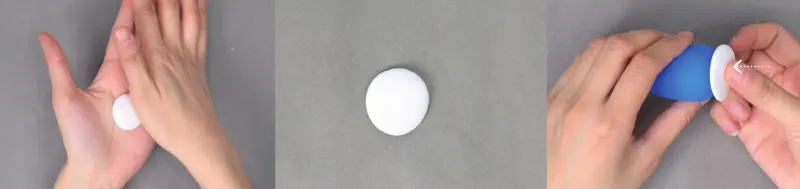
Step 3: We’ll take a little bit more white clay and roll it into a long thin strip. Then wrap the long strip around the mouth of the cup.
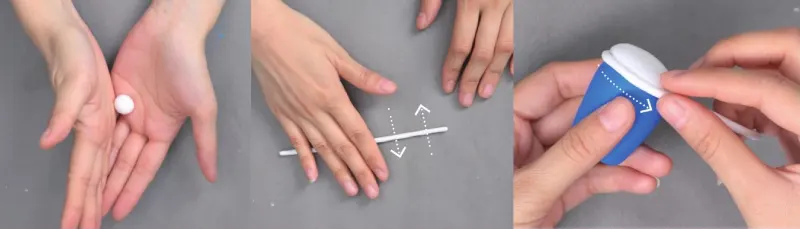
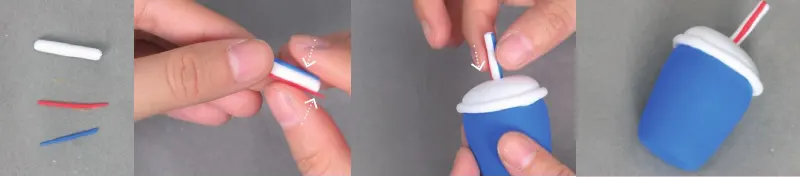
Step 4: In this step, we will create a segment of straw. Start by creating a cylinder out of white lightweight clay. Then, take a bit of red and blue clay, pinch them into two balls and knead them into thin strips. They should be similar in length to the white cylinder. Next, stick the two long red and blue strips on opposite sides of the cylinder. Finally, place it on top of the cup, as shown in the picture.
Step 5: Knead a piece of orange air-dried clay into a ball and flatten it slightly. Then we used a knife or ruler to press 5 cuts into the edges of the clay.
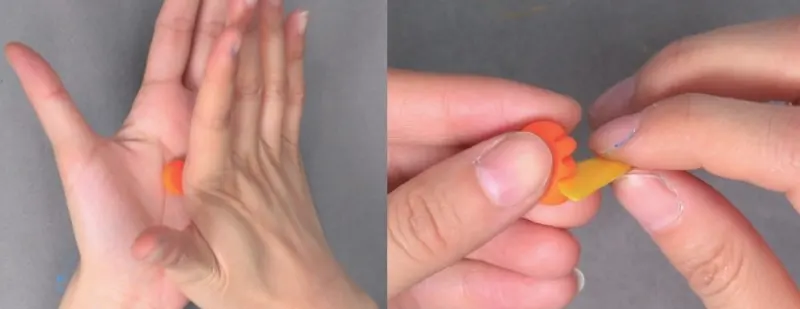
Step 6: Using your fingers, pinch the orange clay into the star shape and stick it to the side of the cup.
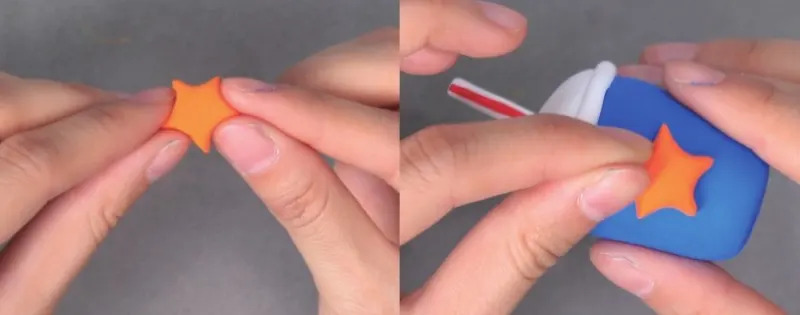
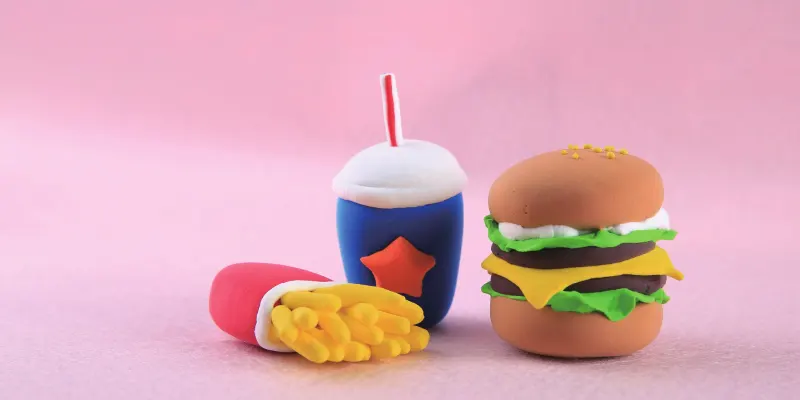
Now that we have a miniature blue clay Coke cup, put it together with fries and a burger! That would be pretty awesome!
Notes
- When making the Coke cups, the opening of the blue cups can be higher so that there will be layers when the white lid clay covers them.
- The white lid should fit as close as possible to the opening of the cup.
- When making straws, the clay should not be too long. Otherwise it will look strange.
- Some clay kits will provide star molds, you can just use it to make that decoration on the cup. The mold will make things easy.
④ Clay Sushi Miniature Craft: Shrimp Sushi
Sushi attracts people with its delicious taste and beautiful appearance. Do you want to try making sushi with air-dry clay? Come and play with your children!
Materials
- Air Dry Clay: White, Orange
- Tools: 1 plastic knife, 1 craft mat
Instructions
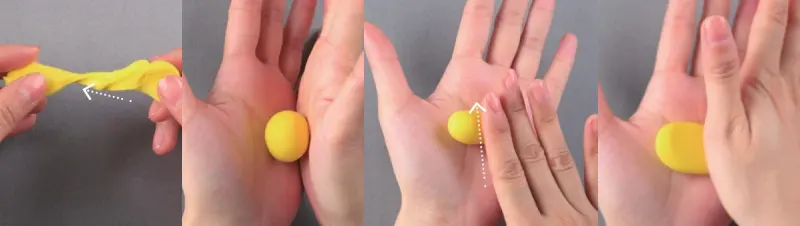
Step 1: Take the white clay, stretch and squeeze it, and knead it into a ball. Then, use your palms and fingers to shape it into an oval. This is the rice ball part of sushi.
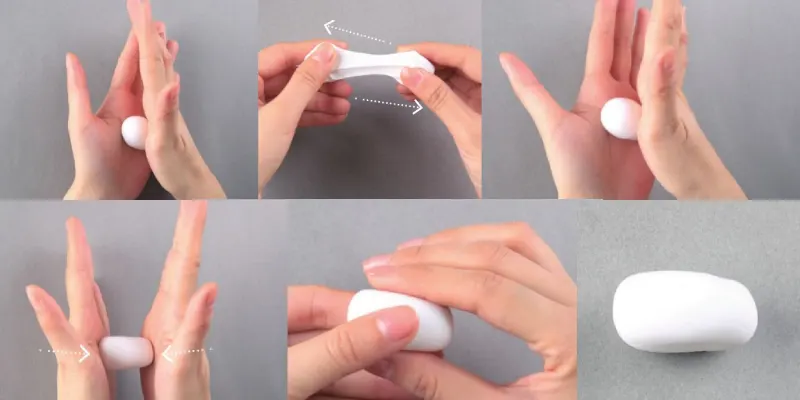
Step 2: Mix a little white clay into the orange clay and stretch and knead it for a while. Be careful not to knead it for too long, as we don’t want it to become a uniform color in the end. We just need it to have some white texture in the orange.

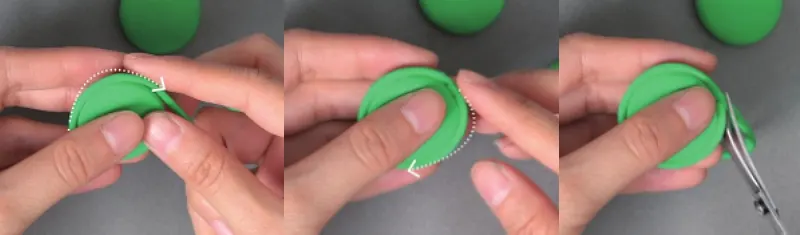
Step 3: Shape the orange and white clay into a teardrop shape. Then, use a plastic knife to cut out the grid on it.

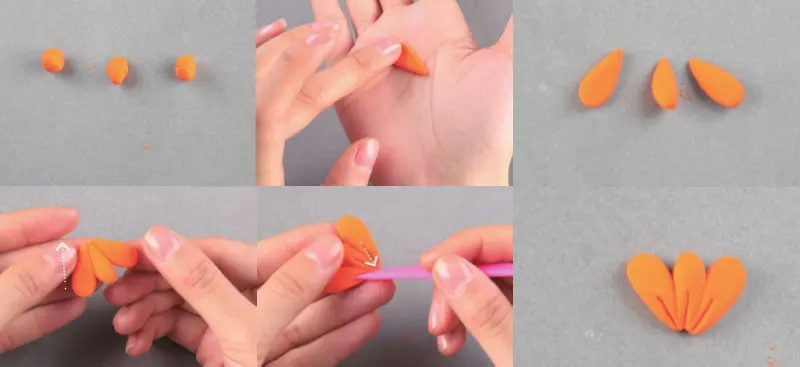
Step 4: Roll out three small balls of orange clay and shape them into water drop shapes with the help of your fingertips and palms. Then, we put the tips of the three droplets together like petals. Finally, use a knife to carve a line at each tip.
Step 5: Attach the petal-shaped shrimp tail to the previously made body, and then place the whole shrimp on the rice ball.
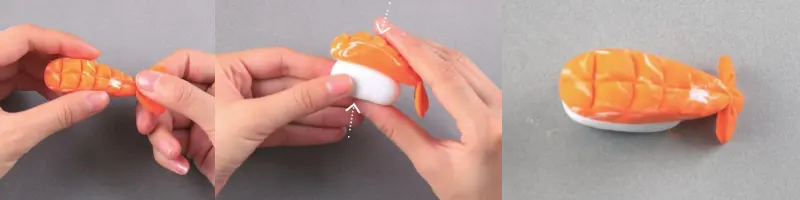
That’s it, we have made a miniature clay shrimp sushi craft.
Notes
- Pay attention to the time it takes to mix the orange and white clay. The longer you knead it, the more uniform its color will be. You may end up with a light orange clay ball instead of orange mixed with white veins.
- When making the shrimp body, we need to make it slightly larger than the rice ball so that the final sushi will look delicious.
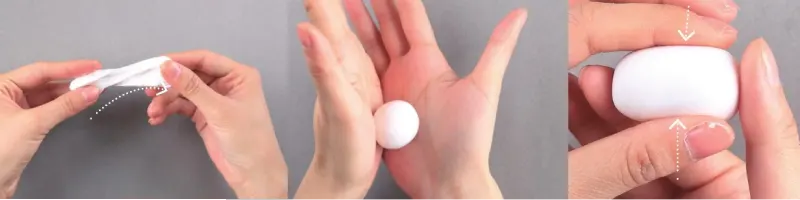
⑤ Miniature Tamago Yaki (Sushi Omelette) Clay Craft
Tamago yaki is also one of the popular sushi, and we will teach you and your kids how to make it step by step in the following tutorial.
Materials
- Air Dry Clay: White, Black, Yellow.
- Tools: 1 plastic knife, 1 roller, 1 craft mat
Instructions
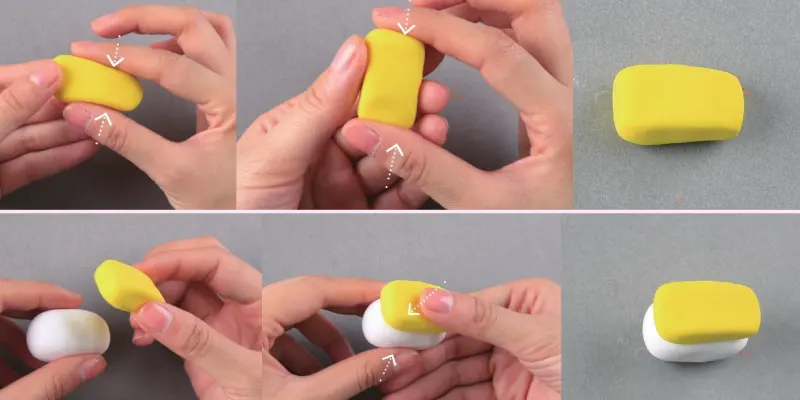
Step 1: Make a rice ball out of white clay. You can stretch it several times before using it to make it softer and easier to shape. When you have rolled it into a ball, use your fingers to press it slightly around it so that it looks like a rice ball.
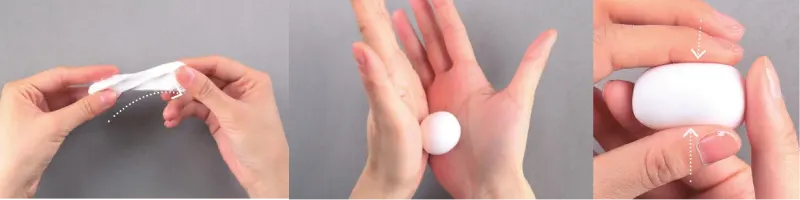
Step 2: Make a sushi omelette with yellow clay. First stretch and knead the clay into a short cylinder, then flatten it lightly. Note that we want it to have thickness.
Step 3: Use your fingers to pinch the clay to make four sides, it will look like a rectangular eraser. Next, we put this omelette on the rice ball.
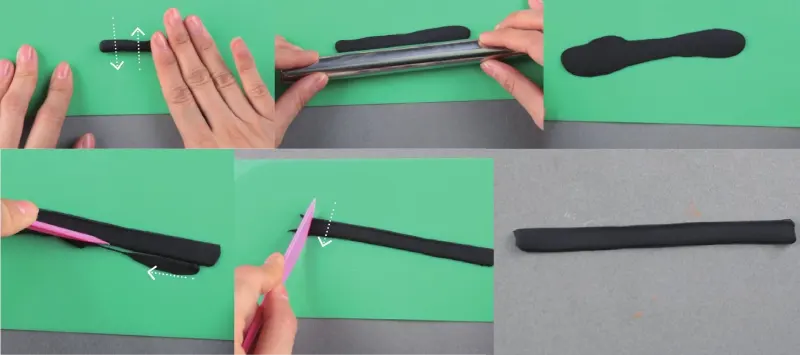
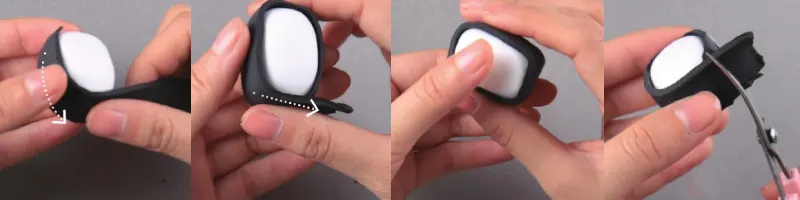
Step 4: Roll the black clay into a long strip on the craft mat. Next, we use a roller to flatten it. Finally, we use a knife to cut off the four sides to make it into a strip shape.
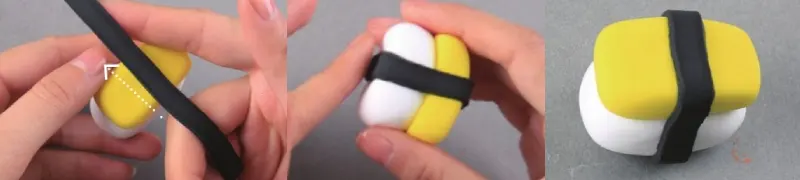
Step 5: As a final touch, we wrap the black strip around the long side of the tamago yaki sushi.
Oh, it looks great, doesn’t it? You can make a few more and put them neatly in your lunch box. Believe me, you will get a lot of compliments.
Notes
The Tamagoyaki sushi craft is easy. You just need to pay attention to the ratio of yellow and white clay. Generally speaking, the yellow clay is half of the white clay.
Besides, the width of the black belt is 1/4 of the length of the rice ball and the omelette. When wrapping, try to stick to the center line of the rice ball. In addition, we want the final connection to be below the rice ball.
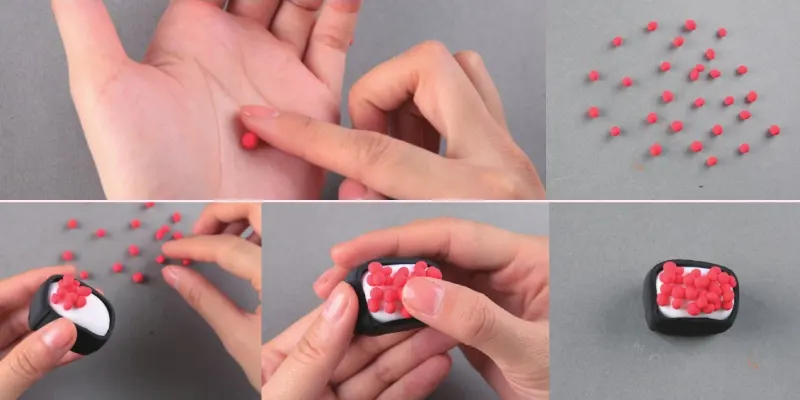
⑥ Mini Sushi Air Dry Clay Craft: Fish Roe Sushi
Fish roe sushi may look a little complicated, but in fact, the steps to make it with air-dry clay are so easy that beginners and children can complete it successfully.
Materials
- Air Dry Clay: White, Black, Red.
- Tools: 1 plastic knife, 1 roller, 1 pair of scissors, 1 craft mat
Instructions
Step 1: Use white lightweight clay to shape a rice ball.
Step 2: Place the black clay on the craft mat and roll it flat with a roller. Next, we use a knife to cut off the four sides of the clay. Please note that the width of the black strip should be the same as the height of the white clay in step 1.

Step 3: Wrap the black ribbon around the rice ball and cut it at the connection with scissors.
Step 4: Make some small balls with red clay. You can first roll it into long strips, cut it into even pieces with a knife, and roll these pieces into small balls. Finally, we just need to pile the red balls on the rice ball.
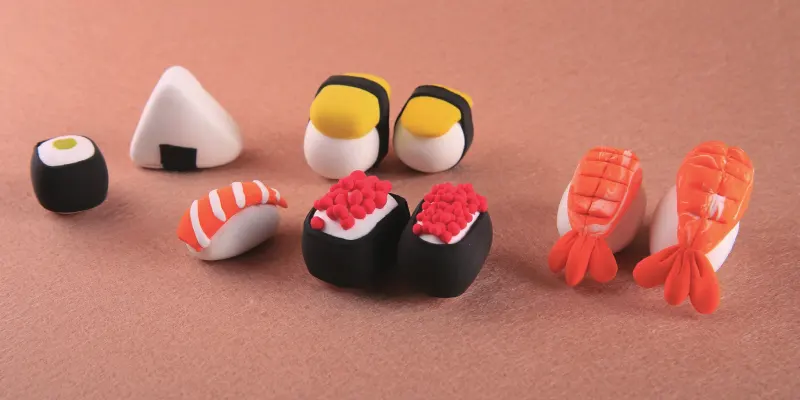
We have made some fish roe sushi, tamago yaki and shrimp sushi, it would be a great idea to put them together. Both you and the kids should be proud of these air-dry clay crafts.
Notes
- When making sushi, we usually need more white clay.
- Since the black band needs to surround the rice ball, we need to make its width about the same as the height of the rice ball. Otherwise it will look weird.
- When making the red clay balls, we need them to be as small as possible. Because real fish roe is like this, our miniature models should restore them as much as possible.
⑦ Mini Clay Macarons Craft
The small round macarons are so popular that people can’t stop looking for them. They can be made into air dry clay crafts and last for a long time.
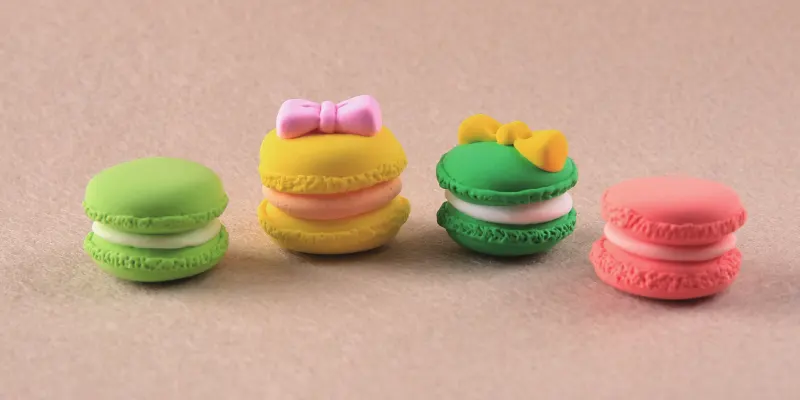
Clay Macarons are great decorations that can be used to beautify our cabinets, bookshelves or windowsills.
Prepare Materials
Air Dry Lightweight Clay: Cyan, White and Yellow.
Tools: 1 plastic knife, 1 pair of scissors, 1 plastic pen.
Instructions
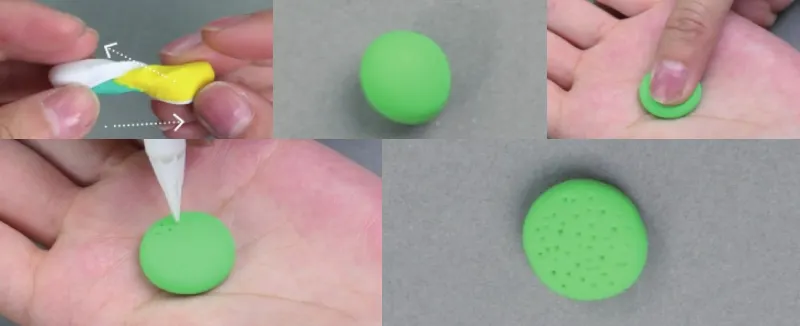
Step 1: Mix cyan and yellow clay to make a pretty macaron green.
Step 2: Use a knife to separate the green clay into four pieces, two large and two small.
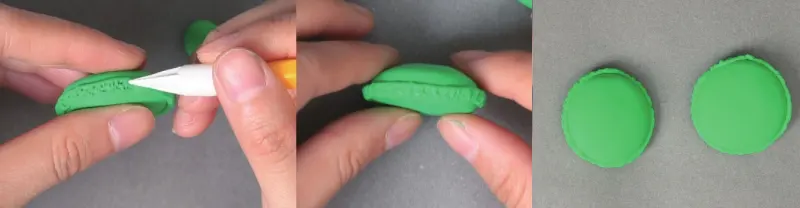
Step 3: Flatten the two large pieces, and roll the two small ones into long and thin strips.
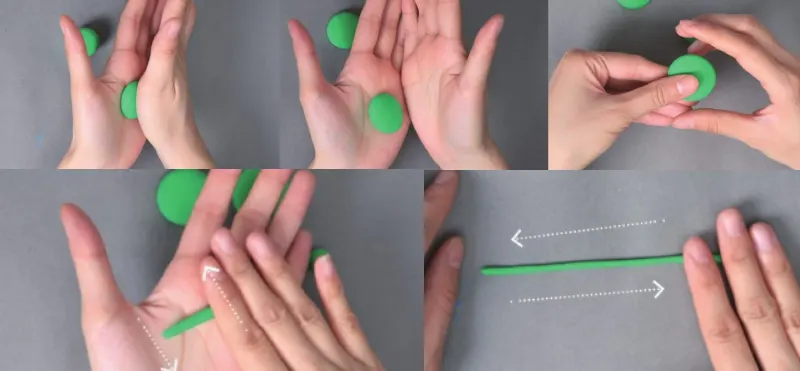
Step 4: Wrap the long strip around the pie-shaped green clay, and use scissors to cut off the excess at the end joint.
Step 5: Use a plastic pen to poke small holes in the strips to create the unique shape of the macarons.
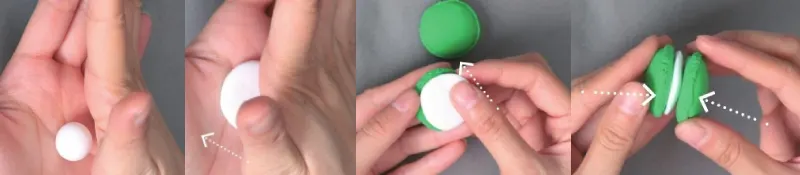
Step 6: Step 6: We will use the white clay to make the macaron filling. Simply roll it into a round shape, flatten it, and sandwich it between two pieces of green clay.
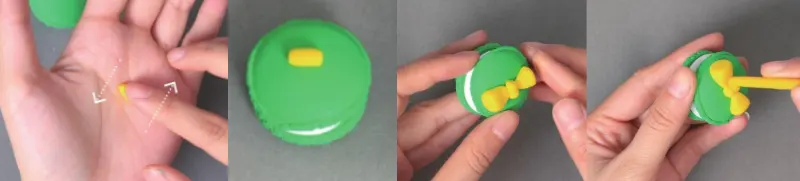
Step 7: Finally, we will add a bow to the macaron. Take some yellow clay and shape it into a short cylinder and two drops. Place them on the macaron and use a round-headed tool to press out the shape of the bow.
The rich color of air-dry clay makes it perfect for making beautiful macarons. You can try to make more clay macaron crafts with other colors.
Notes
- When making macaron fillings, the white clay should be slightly smaller than the green clay, so that it looks fuller. When you clamp the white with the green clay, you can press it gently with your palm to make it compact.
- You can use toothpicks instead of plastic pens, as long as you can form the broken edges on the clay. Please be safe when using these tools.
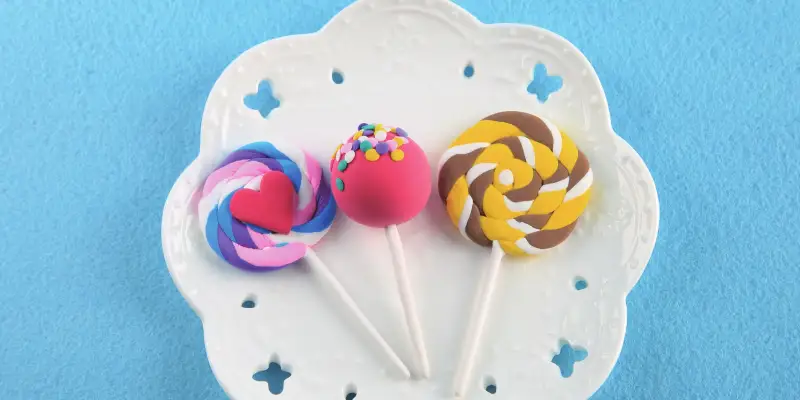
⑧ Lollipop Air Dry Clay Crafts for Kids
Air-dry clay is great for making small crafts like lollipops, and they can be displayed for a long time. This tutorial is about clay lollipops, come and try it.
Materials
Air Dry Super Light Clay: Blue, White, Purple, Pink and Red.
Tools: 1 toothpick, 1 plastic knife.
Instructions
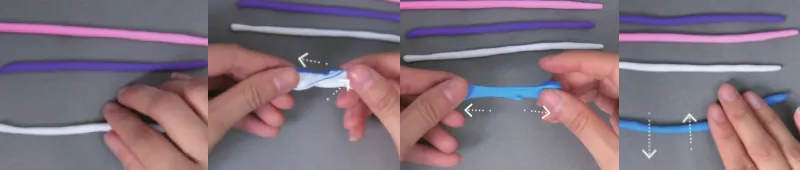
Step 1: Take the pink clay, knead it into a ball, and then roll it into a long strip.
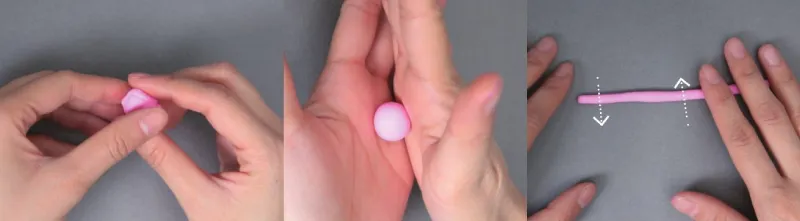
Step 2: We make a purple and a white clay strip as in step 1. Next, we mix blue and white to get a light sky blue. Then we roll it into a long strip as in step 1.
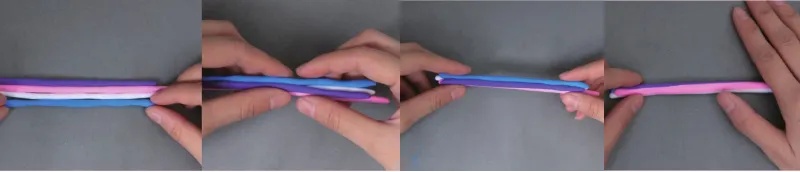
Step 3: Gather the four colors of clay strips together and twist them slightly to interweave the colors.
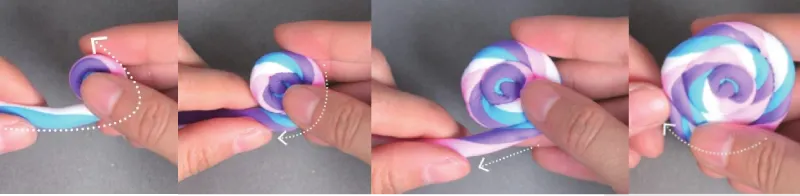
Step 4: Pinch one end of the long strip of clay and twist it as shown.
Step 5: Use white clay to make a long strip about the thickness of a toothpick. Wrap the clay tightly around the toothpick and roll it on a table or craft mat so that the clay can cover the toothpick. Finally, insert the toothpick into the candy made in step 4.
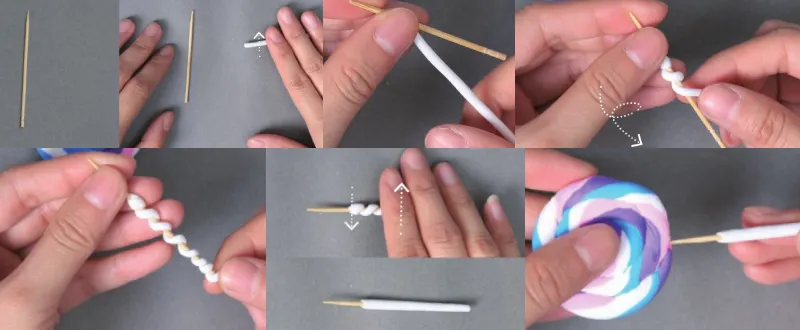
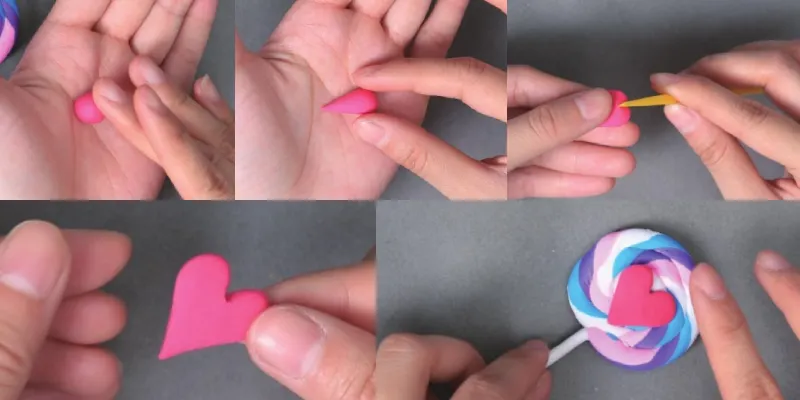
Step 6: Make a heart out of red clay. First, roll the clay into a teardrop shape, then use a plastic knife to cut a hole at the blunt end. Then, use your fingertips to pinch the clay into a heart shape and stick it in the center of the lollipop.
You can follow the steps above to make other lollipops, their tutorials are similar.
Notes
- When making the candy part of the lollipop, we need to curl and rotate the clay at the same time so that the color will be what we want.
- It is best to use a toothpick with a sharp end and a flat end, because the tip may poke out the air-dried clay. The tip of the toothpick can also help connect the lollipop. Please pay attention to safety when using the toothpick.
⑨ Miniature Flowers: Air Dry Clay Daisy Tutorial
Flowers are hard to last, but miniature flowers made of air dry clay can decorate our vases for a long time. This tutorial will teach you how to make a daisy flower out of clay.
Materials
Air Dry Clay: Orange, Cyan, White and Yellow.
Tools: 1 plastic flower stalk, 1 plastic pen, 1 plastic knife, 1 craft mat.
Instructions
Step 1: Mix white, yellow and cyan clay to get a light green color. Roll it into a small ball and flatten it with your thumb. Then, use a plastic pen to poke small holes in the clay.
Step 2: Roll the orange air-dry clay into a cylinder and cut it into small, even pieces using a plastic knife.

Step 3: Place the balls in your palm and flatten them into a drop shape. Then, use a plastic knife to carve stripes on the clay.
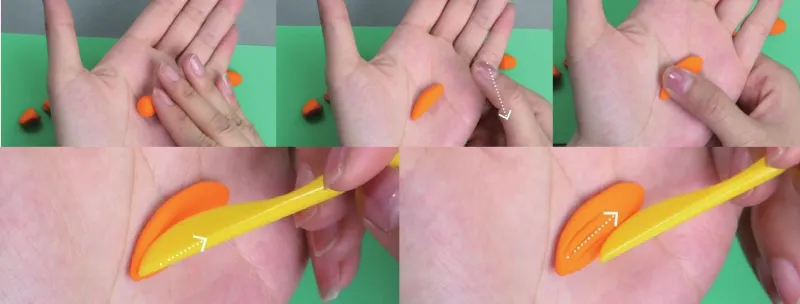
Step 4: Once we have made some petals, stick them layer by layer behind the light green clay. We need to stick on at least three layers of petals.
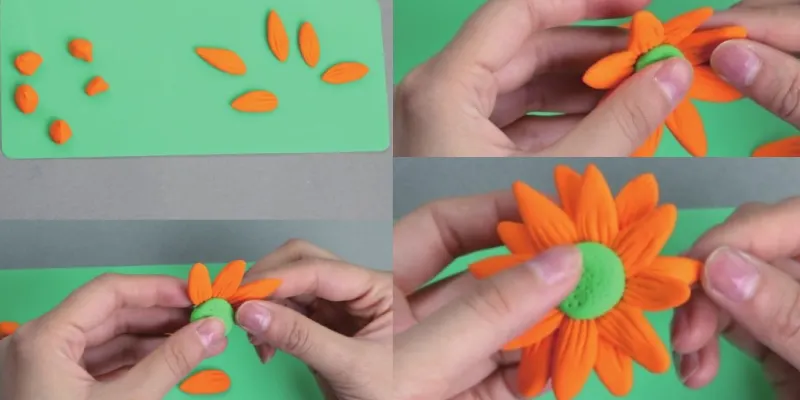
Step 5: Knead some light green clay and stick it behind the flower. Finally, insert the plastic flower stem we prepared into the clay, and after adjusting it, you can put it in the vase for display.

This is a simple clay flower making tutorial, but it requires you and the kids to be patient and careful.
Notes
- When pasting the petals, the last layer should be staggered with the previous layer, just like a real flower.
- This process may take a long time, and the clay may become air dry. You can spray some water on it to keep it at the right viscosity and softness. But not too much, water may also cause unsightly cracks.
⑩ Kawaii Lucky Cat Air Dry Clay Advanced Tutorial
If you have read the previous 9 tutorials and tried to make them, I believe you have mastered the skills of this lightweight clay.
Next we will show you an advanced tutorial, which is more difficult than any of the previous ones, but the finished product is also more beautiful. Now, let’s challenge the lucky cat!
Materials
Air Dry Clay: Rose, White, Black, Dark brown, Yellow and Orange.
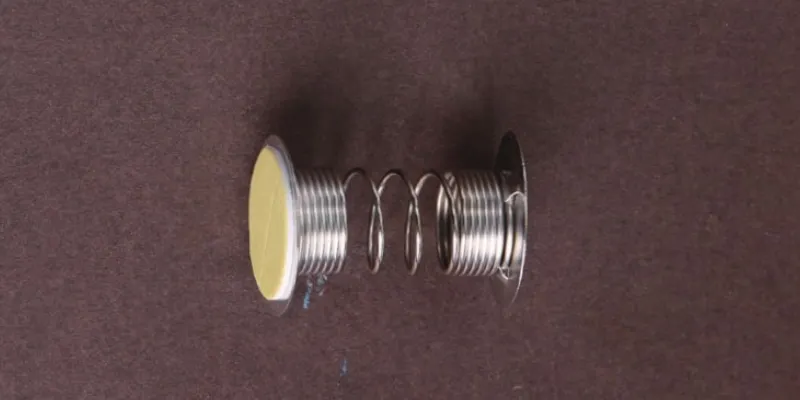
Tools: 1 spring base, 1 roller, 1 plastic knife, 1 pair of scissors, 1 craft mat, 1 cotton swab, 1 blush, 2 signature pens (red + black)
Instructions
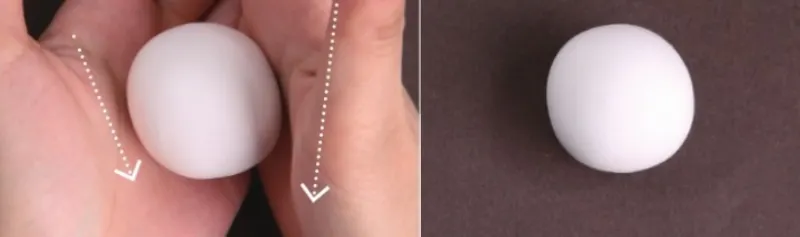
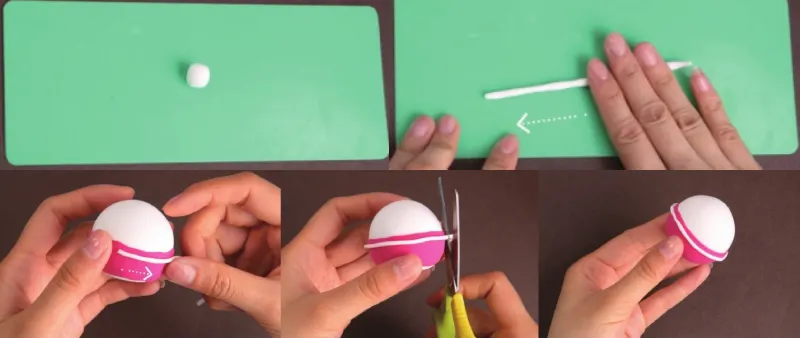
Step 1: Use white clay to roll a ball to form the body of the lucky cat.
Step 2: Make a piece of clothing for the lucky cat. We will use rose red air-dry clay. First, we roll it flat with a roller, and then use a plastic knife to cut off the excess. In this way, we have a long strip.

Step 3: Wrap the rose-red ribbon around the bottom of the white ball and cut off the excess part with scissors.
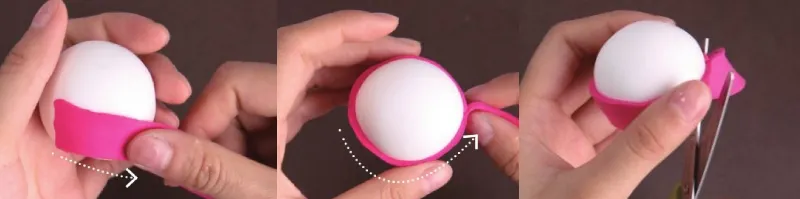
Step 4: Take a little white clay and roll it into a long thin strip on the craft mat. Then, wrap it around the rose red clay and cut off the excess with scissors at the joint.
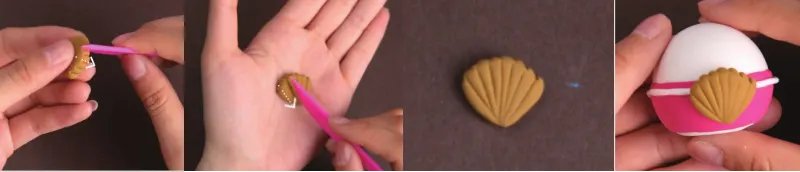
Step 5: Mix the dark brown and yellow light clay to get a light brown color. Roll this clay into a ball and then shape it into a scallop.
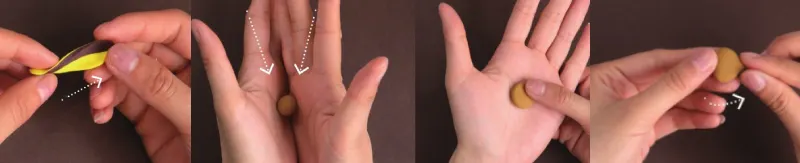
Step 6: Use a plastic knife to carve out the texture of a shell (or fan) on the light yellow clay. Then, we stick it on the lucky cat clothes, just like the picture shows.
Step 7: Use white clay to make 10 sesame seeds. Then stick them on the left and right sides of the lucky cat in the shape of petals.
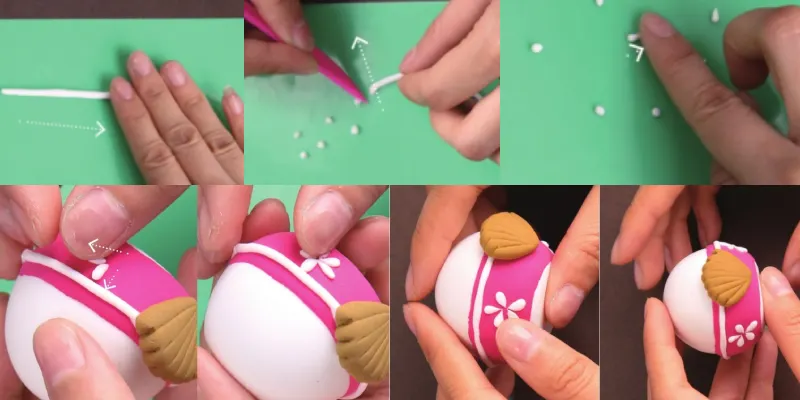
Step 8: Use yellow clay to make two small balls and stick them in the center of the petals.
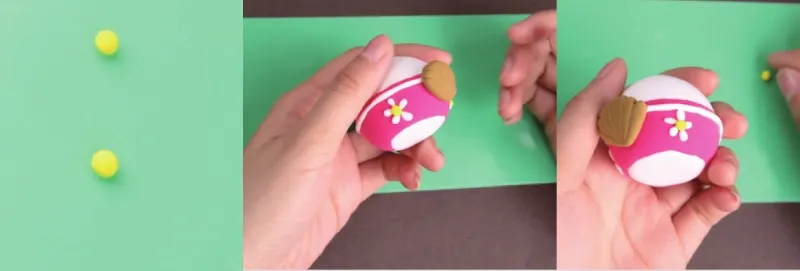
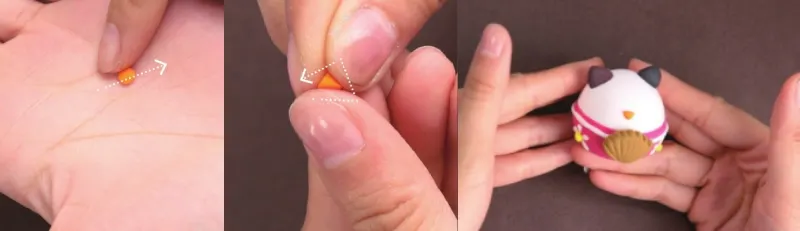
Step 9: In this step, we will make the cat ears. We want the cat to have two ears of different colors, so we need black and dark brown clay. Shape them into small triangles of the same size and stick them on the top of the lucky cat’s head.

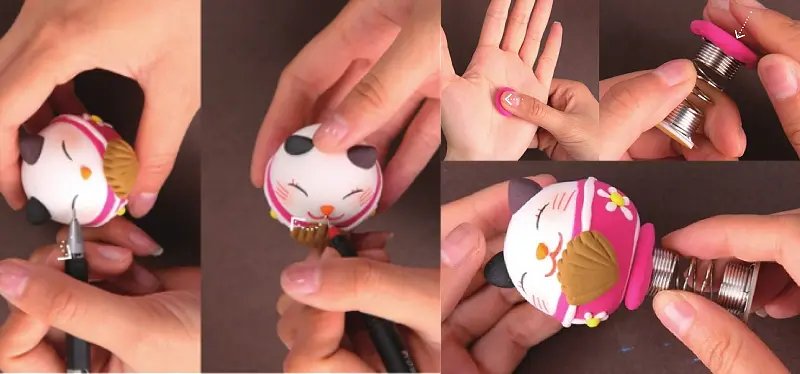
Step 10: Use the orange clay to pinch a small triangle. This will be the cat’s nose, so stick it in the exact center of the cat’s face.
Step 11: Dip a cotton swab in blush and gently apply it on both sides of the cat’s face.
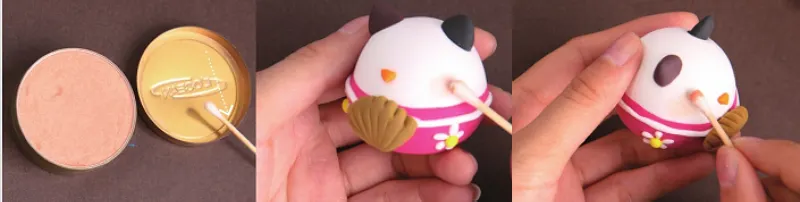
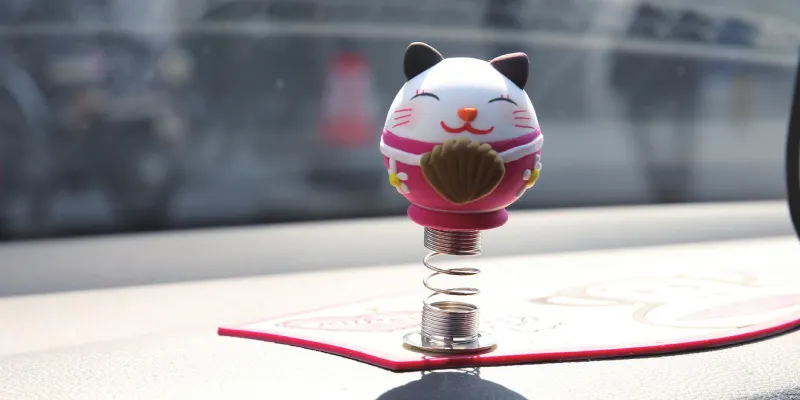
Step 12: Use a black marker to draw eyebrows for the cat, and a red pen to draw the mouth and whiskers. Next, we take out the spring base and stick a piece of rose-red air-drying clay on it. Finally, put our Lucky Cat on it and you’re done!
The difficulty of this air-dry clay craft lies in the fine details. For example, the flower decorations on the clothes, the cat’s eyebrows and whiskers, all of which require you and your children to stay focused and patient.
However, when you have completed this work, you can proudly put it on the bookshelf, windowsill or car. It will be a permanent souvenir.
Notes
1. When making clay flowers and shell decorations, pay attention to their proportions with the clothes. Too big or too small will affect the beauty.
2. You can use the same color clay to make cat ears, or the color you like, it is not the only one.
3. When applying blush to the lucky cat, just use a cotton swab to lightly touch it. Don’t use lipstick instead of blush, it will make the cat’s makeup worse.
4. Although the eyebrow part is simple, it may not be as easy as you think. When drawing eyebrows on clay, you’d better go slowly, otherwise it may ruin everything.
More…
Congratulations! You have completed all the air-dry clay craft tutorials in this blog. I believe that in the future, you and your children will create more beautiful works.
We will also continue to update these tutorials, hoping to help more friends who are interested in clay crafts.